Looking for ways to set up your grow tent…
You will quickly find, that there are many different opinions on the topic.
Is there a best way to set up your grow tent?
Well, assuming you want a:
- Smooth grow;
- Safe environment, and;
- Smell-free grow…
There definitely is a best way to set up your grow tent.
In today’s post, we will guide you, step-by-step, through the process of setting up your grow tent correctly…
Instead of trying to correct mistakes during your grow, it will save you tons of time and effort, to do this right from the start.
Not every piece of equipment is as important to set up correctly…
We will start with the most important supplies:
- Your lights;
- Ventilation (equipment);
- Carbon filter, and;
- Electrical wires and equipment in general.
Get these 4 right, and you’ll have done 90% of the preparatory work that’s needed to successfully finish your (first) grow.
Let’s get to it…
How to Set Up Your Grow Lights
Here’s the general rule with setting up grow lights:
You want your lights as close as possible to your plants, without bleaching them or burning them and while still covering your full canopy.
Because: the closer your lights, the more compact your nodes, the larger, denser, and more potent your buds will be.
But there is such a thing as ‘too close’ and ‘too much light’.
Get your lights too close and you risk burning your plants in 2 ways:
- Light burn / light bleaching, and;
- Overheating / burning.
Both can be devastating to your yield if kept unchecked.
How close this ‘too close’ is all depends on:
- Whether you have LED grow lights, HID (HPS or MH) or CFL;
- How strong your specific light is (in terms of light intensity, but better yet, in terms of watts);
- With LED: what brand and model they are;
- With HID: how effective your heat venting is, and;
- Your coverage area.
The last one speaks for itself…
Your lights should cover the full area of where your plants are located. Plus, your lights should penetrate the full canopy. This means also the lower parts of your plants. Anything less and your yields will suffer.

Also, the more watts your lights, the more heat and intensity they’ll generate, and the more distance they’ll need from your canopy.
For example:
A 1000W HID light will need double the distance from your plants compared to a 300W HID light.
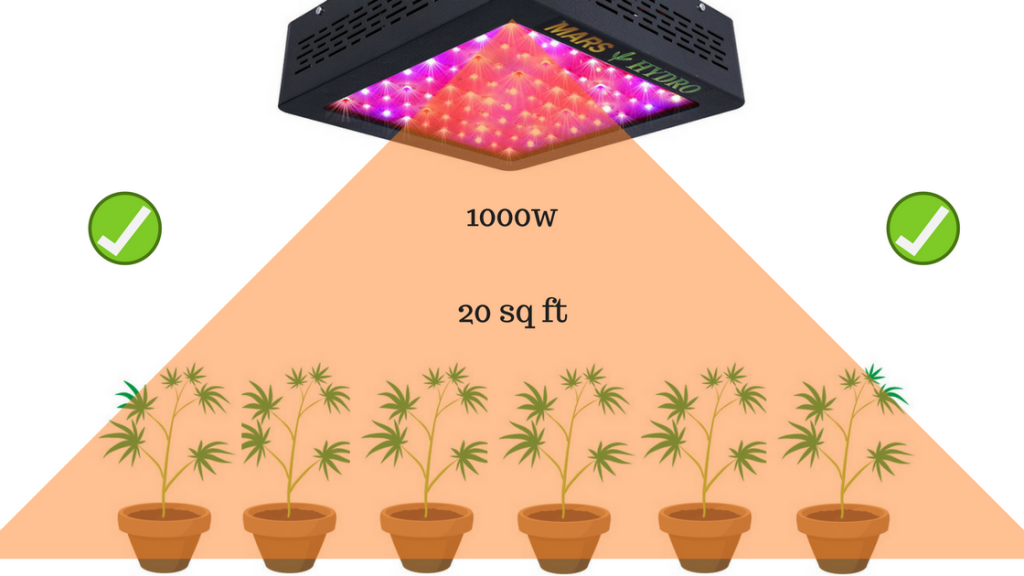
So, what is the optimal distance for a LED light…?
LED grow lights generate less heat than HID lights, but generally, generate more intense light than HID lights (comparing the same wattage lights). Plus, they need some room (height) for all the different colors/wavelengths to blend.
Both these characteristics make LEDs need more distance from your plants than HID lights.
As said before the optimal distance with LEDs also depends on your brand and the specific model of that brand.
Here’s why:
Different LED manufacturers use different diodes with different strengths (1W, 3W, 5W, 10W). Not only that, but they use a different quality diodes and/or (secondary) reflective lenses. All of these factors influence the optimal distance between your plants and LED light.
It’s always best to contact the manufacturer of your particular LED light and ask for optimal distances for the different growth stages:
- Germination / Seedling;
- Vegetative;
- Flowering.
But here are the optimal distances for some of the most popular LED grow light brands:
MARS – (Amazon) and VIPARSPECTRA LED Lights – (Amazon)
- Germination and Clones: 24” – 30” inches above the plants – Growth switch only;
- Vegetative: 18” – 24” inches above the plants – Growth switch only;
- Flowering: 12” – 18” inches above the plants – Growth and Bloom switches together.
Platinum LED – (Amazon) and Advanced LED XTE Lights – (Amazon)
- Germination and Clones: 36” – 40” – VEG switch only;
- Early Vegetative Stage: 24” – VEG switch only;
- Late Vegetative Stage: 24” – VEG and BLOOM switches together;
- Flowering: 18” – VEG and BLOOM switches together.
If you’re still on the lookout for a quality LED light, check out this post:
A very effective strategy for maximizing yield with LED is a flat canopy (make your plants short and wide) so that the light has an easy time penetrating the bottom of the canopy. You want short and wide plants. SCROG is a great training method which helps you achieve this.
What’s The Optimal Distance for a HID (HPS or MH) Light…?
With HID (HPS or MH) lights there is no difference between brands.
All you need to consider to find your optimal distance are 2 things:
- Your watts, and;
- The strength and effectiveness of your heat venting.
And the best way to test if your HID light is too close for your plants, is to test with the back of your hand:
- Too hot for your hand, means too hot for your plant.
If it’s too hot for your hand, move your HID light up in 1-2 inch increments, until it stops burning your hand.
To give you a general idea, here’s a basic guideline based on numbers:
- 400W: 16-24 inches (40-60cm);
- 600W: 24-31 inches (60-80cm);
- 1000W: 31-39 inches (80cm-100cm).
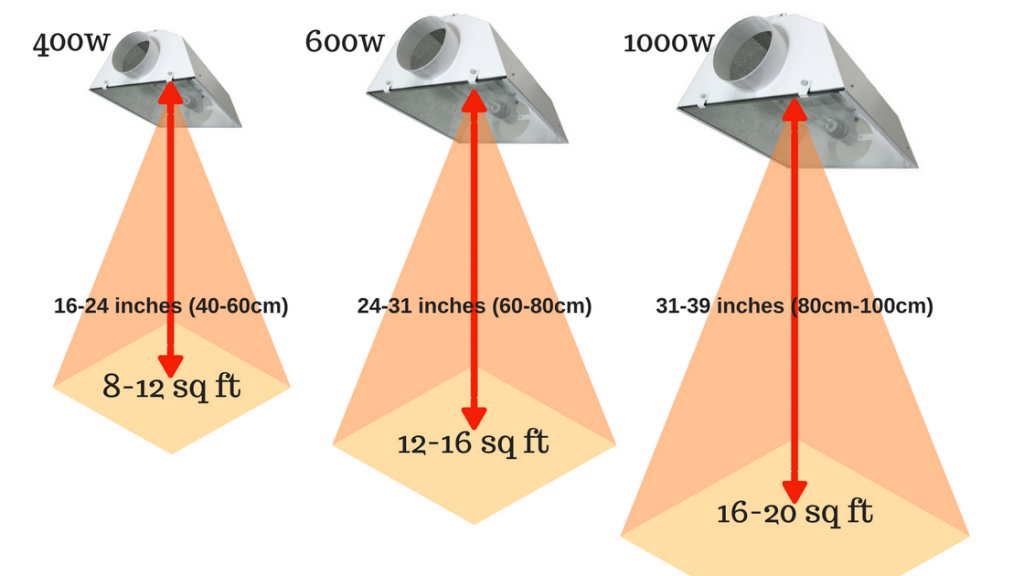
These numbers are based on HID lights with regular reflectors (non-air-cooled).
If you do have air-cooled reflectors, you can put your lights quite a bit closer and that’s where the ‘back-of-the-hand-test’ comes in (check the heat with the back of your hand, and when it’s too hot for your hand it’s too hot for your plants).
Classic example:
- Apollo Horticulture 400 Watt Grow Light Digital – (Amazon)
Next up…
How to Set Up Your Ventilation
Setting up your ventilation properly is extremely important.
Here’s why:
To grow properly, your plants need a constant supply of fresh air with CO2.
Not only that…
But it’s also your main tool for temperature control. This is especially important if you’re growing with HID lights which radiate a lot of heat or live in a tropical climate.
Now that you understand the importance of setting up your ventilation properly…
Here’s how to do it:
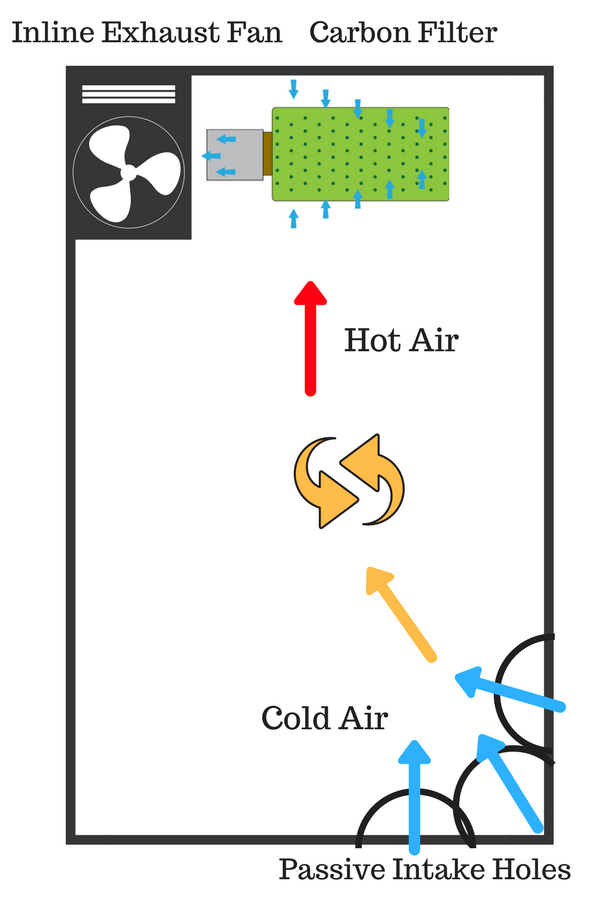
First of all, it’s important that you position your exhaust fan on the opposite side of your passive intake holes or inline intake fan. There should be a lot of space between them. This way you’ll maximize the airflow in your grow space / grow tent, which helps greatly with venting heat and providing a constant stream of fresh air.
Another important rule:
Place any exhaust fans in the top part of your grow tent / grow space. Hot air rises higher, and you want to filter out the hot air more than anything.
If you’re going for passive intake holes, it’s important that they are at least 3 times the size of the surface area of your exhaust fan’s surface area. Usually, a tent does have passive intake holes. If not, it’s best to make 3 same size holes on the opposite side of where your exhaust fan is. You could also make 1 big hole, which is 3 times the size…but this will be less effective in maximizing airflow.
If you’re growing with HID lights or live in a tropical climate, you might need extra measures:
- Regular circulation fans that are placed to the sides and some inches higher than your plants.
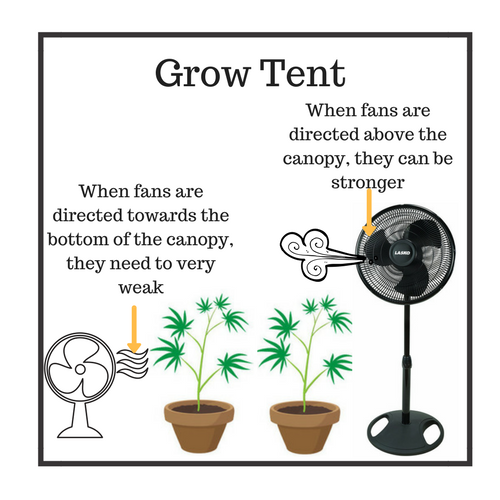
This will greatly enhance the movement of air between your lights and the canopy, which in turn will help greatly with venting the heat.
Just make sure not to point them directly towards your plants with full force and they don’t blow too hard as this can result in ‘windburn’ (windburn is the term for leaves drying up because of a rapid loss of water, caused by strong winds).
How to Set Up Your Carbon Filter
There are 2 ways you can set up your carbon filter based on whether you’re using air-cooled HID lights or not.
If you’re not using an air-cooled HID light (LED, CFL or regular HID):
In this case, the best way is to connect the carbon filter to the intake of your exhaust fan, inside your grow space / grow tent. This way you will be sucking the air straight through the filter, then outside of your tent.
This simply is the most foolproof way to prevent unwanted smells.
But here’s the thing:
You can only do this if you have enough room in your grow tent.
And this I exactly one of the reasons why it’s always a good idea to get a bigger grow tent than purely the size that’s needed for your plants. The other reason is that you want enough room in your grow space / grow tent to conveniently inspect your plants and make adjustments to the height of your lights for example.
If for whatever reason you don’t have enough room to place the carbon filter inside the tent…
Place your exhaust fan outside your tent, but keep the carbon filter inside. This will be quite a bit noisier and less stealthy though.
The least preferred method is to place both the carbon filter and exhaust fan outside your grow space / grow tent. But if you do this, take extra caution to seal everything properly (duct tape can come in handy here).
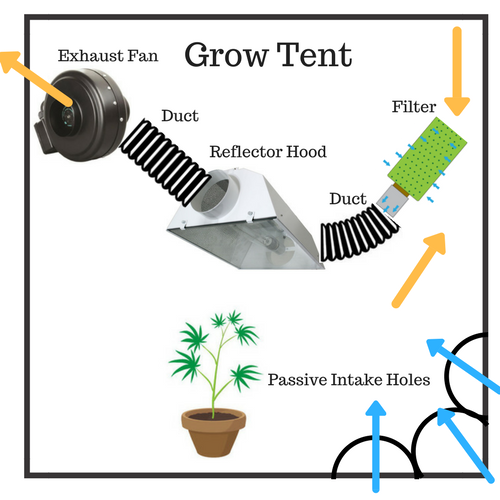
If you are using an air-cooled HID light:
In this case, you just want to make sure the carbon filter is before the reflector hood. This means you can do either:
- Filter > Ducting > Reflector hood > Ducting > Fan:
OR
- Filter > Fan > Ducting > Reflector hood > Ducting:
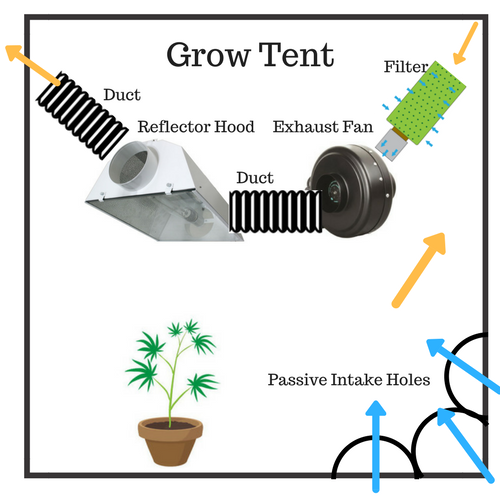
Both work fine and in both cases, you keep the carbon filter inside…which is the best way to filter out marijuana odor.
How to Set Up Your Electrical Wires and Other Electrical Equipment
Anytime there are liquids and electrical equipment used together in a confined space…
There’s a safety risk involved.
Here’s the cardinal rule when it comes to the electrical wires in your grow tent:
KEEP THEM OFF THE FLOOR!
This way you run much less risk to get electrocuted in case you do spill some nutrient solution or water.
Now, what I like to do with any sets of bundled up wires, is to attach them to a piece of wood and attach this piece of wood to the poles in the tent. This way you’ll keep them off the floor, have an extra buffer (wood) and keep your cables organized!
Another important note regarding electrical wires:
Bundle them together using zip ties / cable ties – (Amazon).
With regards to other electrical equipment…
Anything that’s non-essential for the growth of your plants other than the carbon filter (like pH- PPM-meters, your light’s ballast and pumps, reservoirs and other parts of a hydro system, other than the buckets/pots):
Keep them outside your grow tent!
Where to Set Up Your Pots, Buckets or Hydroponic System
To give your light an easy time covering and penetrating your full canopy…
It’s best you place your plants and the pots / buckets they’re in, in the center of your growing space / grow tent.
This way you’ll give your lights a much easier time to penetrate the whole canopy. If some of your plants hug the borders of your grow space, it will be difficult for your lights to reach those specific areas.
Alright, so you’ve set your grow tent up…
The next step is:
- Germinating Your Marijuana Seeds